
Homeowners often miss small roof issues that cause big leaks later. Lifted or missing shingles, cracked or curling tabs, and UV-driven granule loss are early warnings. Loose flashing at chimneys and skylights and dried sealant around vents let water in. Clogged or mis-sloped gutters back water under edges. Nail pops and fastener back-out break seals. Subtle attic signs, pests, and sagging decking indicate deeper trouble. Seasonal inspections, targeted repairs, and proper ventilation prevent escalation—and there’s more that can sharpen awareness.
Key Takeaways
- Lifted, cracked, or missing shingles expose fasteners and underlayment, leading to leaks and wind damage if not promptly repaired.
- Failing flashing and deteriorated sealant at chimneys, skylights, and sidewalls are common, hidden leak sources.
- Clogged or improperly sloped gutters cause overflow, fascia/soffit rot, and ice dams that force water under shingles.
- Inadequate attic ventilation traps moisture and heat, accelerating shingle aging, decking warp, and fastener corrosion.
- Moss, algae, and lichen retain moisture, lift shingle edges, and hasten granular loss and roof failure.
Lifted or Missing Shingles
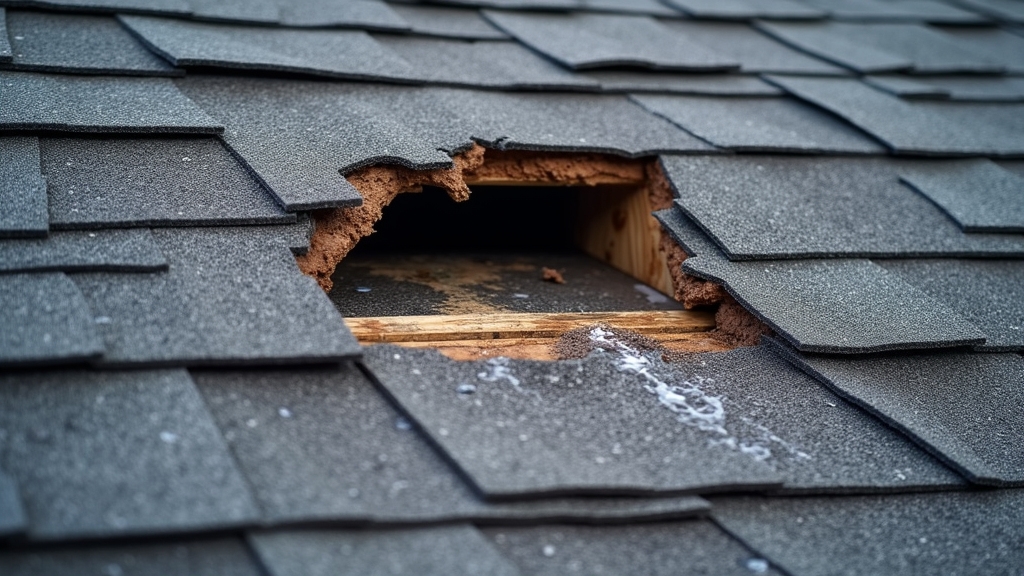
Wind, age, or improper installation can loosen shingles, leaving them lifted or missing and exposing the roof deck to water intrusion.
When edges lift, fasteners and underlayment face direct weather, accelerating deterioration and enabling leaks at seams, valleys, and penetrations. Missing pieces also create catch points where wind can peel adjacent courses.
A clear plan helps. Core shingle maintenance tips include gently reseating lifted tabs with roofing cement, replacing absent shingles promptly, and verifying nail placement and count.
Flashings and ridge areas should be checked because gaps there spread damage. Seasonal inspection importance is high: spring reveals winter stress, and fall prepares the surface for storms.
From the ground, binocular checks spot irregular lines; after severe weather, a timely professional evaluation limits escalating repair costs.
Cracked, Curling, or Blistered Shingles
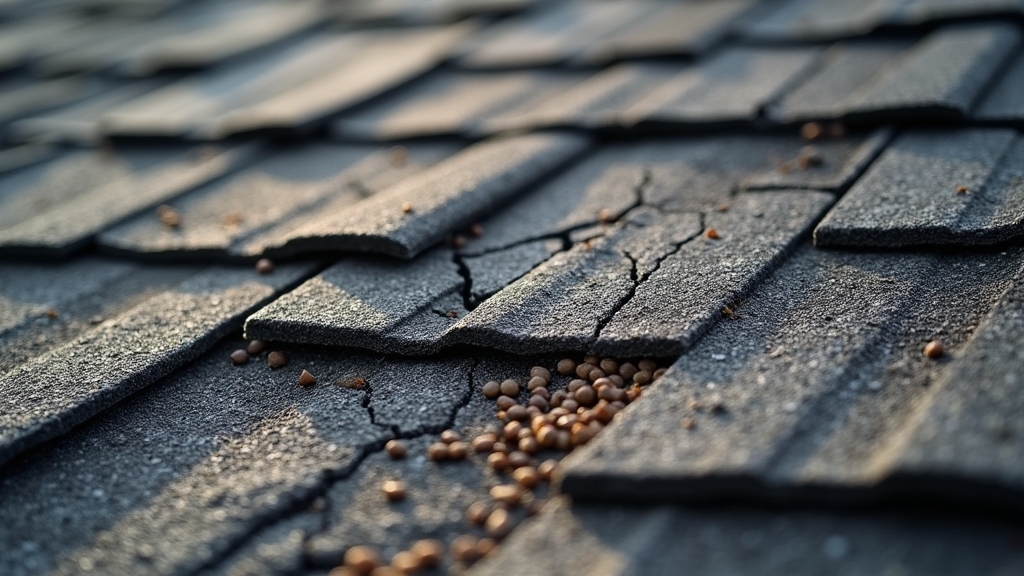
Cracked, curling, or blistered shingles often stem from UV exposure, poor ventilation, aging materials, or installation errors.
Early warning signs include granule loss, edges lifting, spider-line cracks, and soft spots that indicate trapped moisture.
The choice between repair and full replacement depends on damage extent, roof age, and whether underlying decking or ventilation problems are present.
Causes and Risk Factors
Weathering tells the first part of the story: prolonged UV exposure dries asphalt binders, making shingles brittle and prone to cracking, curling, or blistering. Heat cycles amplify stresses, while cold snaps promote micro-fractures. Wind uplift can unseal tabs, allowing moisture intrusion that blisters under solar heat. Poor attic ventilation traps heat and humidity, accelerating asphalt oxidation and felt delamination. Inadequate nailing, low-slope installation, or mismatched shingles raise failure odds. Manufacturing defects and aging compounds the risk, but weather related damage often dominates.
| Factor | How it elevates risk |
| UV, heat, freeze-thaw | Degrades binders, warps mats, initiates cracks |
| Ventilation, insulation | Excess heat/moisture drive curling and blisters |
| Workmanship, maintenance neglect | High nails, debris, and missed sealant lines invite failure |
Contaminants, such as moss or soot, retain moisture and worsen thermal stress.
Early Warning Signs
Spot subtle shifts before leaks appear: brittle corners, hairline fissures radiating from nail heads, tabs curling upward at the edges, or surface blisters that feel spongy under light pressure.
These are early warning signs that point to aging asphalt, UV fatigue, or trapped moisture. Early detection depends on a systematic roof inspection performed from safe vantage points with good lighting. Granule loss around downspouts and in gutters often accompanies these defects, signaling reduced UV protection.
Key checkpoints to structure a quick assessment:
- Scan shingle fields for curling tabs and lifted edges.
- Look closely for cracks near fasteners and penetrations.
- Press gently on suspected blisters; note softness or rupture.
- Check gutters and valleys for granules and shingle fragments.
Consistent documentation helps track progression between seasons.
Repair vs. Replacement
After early signs appear—curling tabs, hairline cracks near fasteners, or spongy blisters—the next decision is whether targeted fixes will suffice or if a full section needs renewal.
The choice hinges on scope, age, and moisture intrusion. Limited damage in isolated sun-exposed patches typically favors spot repairs, provided the underlayment is dry and nails still bite.
Repair considerations include matching shingle profile and color, sealant longevity, and thermal cycling that may reopen seams.
Widespread curling, granular loss, or soft decking shifts the calculus toward replacement.
Recurrent leaks, attic staining, or brittle shingles indicate system failure rather than surface wear.
Replacement costs rise with steep pitches, multiple layers, flashing complexity, and ventilation upgrades, yet they often reduce future leak risk and stabilize energy performance.
Failing or Loose Flashing
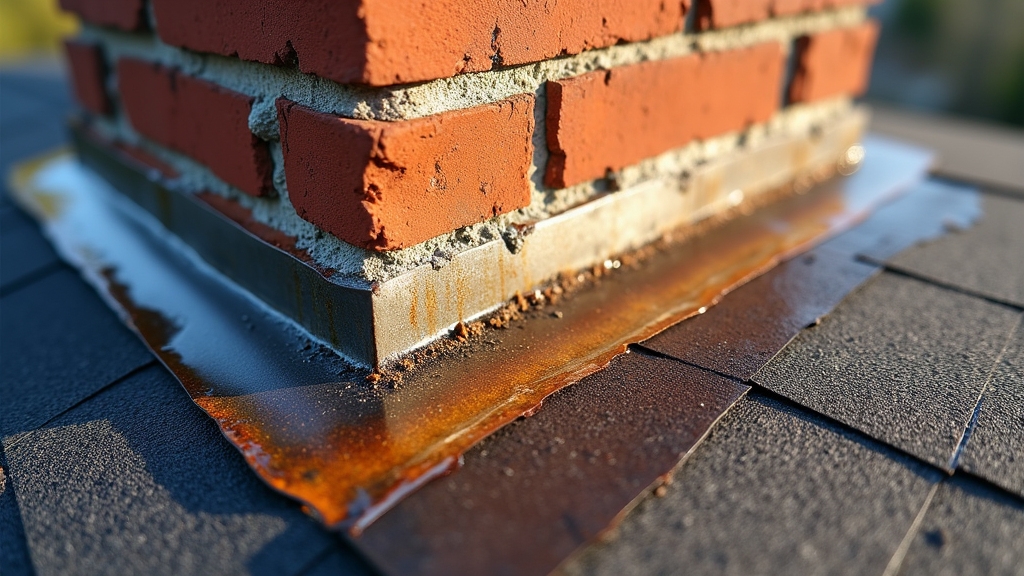
Failing or loose flashing often explains leaks at chimneys, skylights, valleys, and wall intersections.
Noting rust, gaps, or dried sealant at these common leak locations helps pinpoint problems early.
Routine maintenance—re-securing fasteners, resealing joints, and replacing damaged sections—prevents moisture intrusion and extends roof life.
Common Leak Locations
Metal, rubber, and step flashing often become the weak links where roofs meet walls, chimneys, skylights, and vent penetrations.
These connections are common leak sources because flashing must bridge dissimilar materials that expand and contract at different rates. Small gaps, lifted edges, or missing sealant allow water intrusion to travel behind siding, under shingles, and into framing.
Gravity and wind-driven rain exploit even minor discontinuities, concentrating leaks at predictable points that are frequently overlooked.
Key hotspots include:
- Sidewalls and roof-to-wall junctions where step flashing is misaligned or buried by siding.
- Chimney perimeters with failed counterflashing or cracked mortar joints.
- Skylight curbs with degraded membrane-to-metal interfaces.
- Pipe boots and vent stacks where UV-aged rubber splits or clamps loosen.
These locations deserve focused attention during any roof evaluation.
Proper Flashing Maintenance
Though shingles often draw the eye, durable roofs depend on sound flashing that is inspected, secured, and sealed before small gaps evolve into leaks. Professionals note that failing or loose flashing often originates from rushed flashing installation, incompatible flashing materials, or dried sealant. Routine checks around chimneys, skylights, walls, and valleys catch lifted edges, punctures, and corroded sections early. Fasteners should be retightened, laps resealed with compatible products, and damaged metal or membrane replaced.
| Risk | Feeling |
| Hidden seepage | Unease |
| Ceiling stains | Frustration |
| Mold growth | Alarm |
Seasonal maintenance matters: after storms, confirm no movement or missing pieces; in heat, watch for expansion gaps. When replacing shingles, flashing should be evaluated, not ignored. Accurate bends, proper overlaps, and firm anchoring extend service life.
Damaged or Deteriorated Sealant Around Penetrations
Countless roof leaks trace back to cracked, shrunken, or missing sealant around penetrations such as vents, chimneys, skylights, and pipe boots.
When UV exposure, movement, or age break down the bead, water travels behind flashings and into the roof deck.
Sound sealant application and routine sealant maintenance reduce this risk, but many roofs go years without inspection.
A clear plan helps owners and managers stay ahead of failures:
- Inspect penetrations twice yearly and after major storms, noting gaps, splits, or loss of adhesion.
- Remove failed material, clean surfaces, and apply compatible sealant at the correct thickness.
- Use high-quality, UV-stable products matched to substrate and temperature movement.
- Record dates, products, and locations to schedule reinspection and forecast replacement intervals.
Clogged or Improperly Sloped Gutters
Clogged or improperly sloped gutters cause water backing and overflow that can spill behind the gutter line.
This persistent moisture accelerates fascia and soffit rot, compromising roof edges and ventilation.
In colder climates, trapped water forms ice dams that force meltwater under shingles, leading to interior leaks.
Water Backing and Overflow
When gutters are obstructed or pitched incorrectly, water backs up, spills over the edges, and saturates building components it was intended to divert. In this condition, water drainage becomes unpredictable, pushing water toward seams, fasteners, and vulnerable roof-wall intersections.
Overflow prevention relies on clear pathways and proper slope to move water swiftly to downspouts. Left unchecked, backed-up flow increases the load on hangers and can drive water beneath shingles, where capillary action and wind can spread moisture laterally.
Key observations help diagnose the problem:
- Persistent rimlines of sediment marking past overflow events
- Splashback stains on siding near downspouts and corners
- Sagging gutter runs indicating inadequate pitch or structural fatigue
- Standing water visible after rainfall, confirming insufficient fall
Correction depends on cleaning, re-sloping, and verifying adequate discharge capacity.
Fascia and Soffit Rot
Overflow that repeatedly wets the roof edge often shows up as rot in the fascia and soffit, where trapped moisture degrades paint films, swells wood fibers, and invites decay.
Misaligned or clogged gutters concentrate water at the eaves, allowing capillary action to wick moisture behind trim. Paint blistering, soft spots at nail heads, and staining under the eaves are early warnings. Left unchecked, fasteners loosen, ventilation suffers, and pests exploit softened wood.
Prevention centers on clear downspouts, correct gutter slope, and drip edge continuity.
When damage exists, targeted fascia repair replaces compromised sections, primes cut ends, and restores a continuous water-shedding plane. Proper soffit installation maintains intake ventilation while using decay-resistant materials and sealed joints.
Flashing alterations and regular inspections complete durable, low-maintenance eave assemblies.
Ice Dams and Leaks
Winter’s freeze-thaw cycle turns poorly draining gutters into ice-making machines, backing meltwater under shingles and into the roof deck.
When gutters are clogged or sloped incorrectly, water stalls, freezes, and forms ice ridges that trap additional runoff. The result is wet insulation, stained ceilings, and hidden decay.
Effective ice dam prevention begins with restoring proper gutter pitch, clearing debris, and ensuring downspouts discharge freely.
Ventilation and attic insulation balance roof temperatures and reduce refreezing risk, while early leak detection limits interior damage.
Key actions include:
- Verify gutter slope: about 1/16–1/8 inch per foot toward downspouts.
- Clean gutters seasonally and install high-flow outlets or guards.
- Improve attic insulation and continuous ridge/soffit ventilation.
- Add heat cable only as a temporary control, not a substitute for repairs.
Inadequate Attic Ventilation
Although it’s often overlooked, inadequate attic ventilation can quietly undermine a roof’s performance and lifespan. When stale air cannot escape and fresh air cannot enter, moisture lingers, metal fasteners corrode, and decking can warp.
Proper attic air circulation helps dry incidental moisture and supports roof temperature regulation, reducing thermal stress on shingles and underlayment.
Proper attic airflow dries moisture and stabilizes temperatures, easing stress on shingles and underlayment
In warm seasons, trapped heat raises attic temperatures, baking shingles from below and accelerating granular loss. In colder climates, poor venting allows humidity to condense on sheathing, promoting mold and hidden decay.
Balanced intake and exhaust—typically soffit vents paired with ridge or roof vents—creates a continuous airflow path. Assessment should confirm open vent pathways, no blocked soffits, and adequate net free vent area matched to attic size and roof design.
Insufficient or Compressed Insulation
When attic insulation is thin, patchy, or compressed, it loses its R-value and allows heat to move freely, stressing the roofing system.
Heat escape in winter and heat gain in summer amplify expansion and contraction, loosening fasteners and aging shingles prematurely.
Compressed batts create thermal bridging at joists and around penetrations, inviting condensation that can wet sheathing and foster wood decay.
Selecting appropriate insulation types and maintaining full loft are essential.
To assess and correct the problem:
- Measure depth and continuity; compare to recommended R-values for the climate.
- Identify compression near walkways, storage, and wiring; restore thickness with proper platforms.
- Address thermal bridging with continuous layers or blown-in coverage.
- Seal air leaks before adding insulation to prevent moisture-laden air movement.
Moss, Algae, and Lichen Growth
Moisture control that protects insulation also matters on the roof surface, where persistent dampness encourages moss, algae, and lichen to colonize shingles.
These organisms trap moisture, lift edges, and speed granule loss, shortening service life. Shade, overhanging trees, and limited airflow increase risk. Identification is straightforward: moss appears as green clumps, algae as dark streaks, lichen as crusty patches.
Moss, algae, and lichen trap moisture, lift shingle edges, and hasten granule loss—especially in shaded, low-airflow areas.
Effective response combines safe moss removal with long-term algae prevention. Gentle brushing and approved cleaners protect shingle coatings; pressure washing is avoided.
Zinc or copper strips near ridges create ions that inhibit regrowth. Trimming branches improves sun exposure and drying. Gutters are kept clear to reduce debris accumulation.
Routine inspections after wet seasons catch early colonization and guide simple, low-impact maintenance.
Ponding Water on Low-Slope Roofs
Even brief storms can leave water lingering on low-slope roofs where drainage is inadequate, creating shallow ponds that persist beyond 48 hours. Prolonged moisture stresses membranes, seams, and insulation, accelerating deterioration.
Weight from standing water can deform decking, lowering slope and worsening the cycle. Observers should assess surface irregularities, blocked scuppers, and undersized drains, then implement targeted drainage solutions.
Ponding’s long term effects include UV-accelerated membrane breakdown, microbial growth, and trapped moisture that compromises thermal performance. Corrective action should prioritize design and maintenance over quick patches, focusing on predictable water flow.
- Verify slope with level measurements and correct with tapered insulation.
- Clear and resize drains, scuppers, and gutters to meet rainfall demands.
- Reinforce membranes at pond-prone areas.
- Schedule inspections after storms to confirm effective runoff.
Hidden Leaks Around Skylights and Chimneys
Hidden leaks often originate where skylights and chimneys rely on flashing, which can corrode, lift, or be improperly installed.
Subtle moisture signs—stained drywall, faint musty odors, or minor plaster blistering—may precede obvious dripping.
Seasonal expansion gaps around frames and masonry widen pathways for water intrusion if not sealed and maintained.
Flashing Failures
Although roof surfaces often appear intact, water frequently enters at the seams: the metal flashing around skylights, chimneys, and wall intersections.
Flashing failures develop when flashing materials corrode, crack, or separate from adjoining surfaces. Small gaps allow capillary action to pull water inward, bypassing shingles. Poor flashing installation—improper overlaps, incorrect step-flashing sequencing, or inadequate sealant—accelerates leakage, especially under wind-driven rain.
Common risk patterns include:
- Short or misaligned step flashing that does not overlap each course.
- Counterflashing not embedded or regletted into mortar joints on chimneys.
- Skylight curb flashing that lacks high backs or end dams.
- Galvanic corrosion from mixed metals and incompatible sealants.
Routine evaluation should confirm secure fastening, correct sequencing, sound sealant at terminations, and replacement with durable metals where deterioration is evident.
Subtle Moisture Signs
Where do early warnings of a leak first appear when roof surfaces look sound? Around skylights and chimneys, faint clues develop before stains spread. Subtle discoloration on drywall, a slightly swollen trim board, or a musty odor near ceiling penetrations often signals hidden leaks.
Condensation rings on fasteners in the attic, rusty nail heads, and damp insulation corners focus moisture detection where water migrates along framing.
Close inspection should note hairline cracks in sealant, darkened wood sheathing, and soft spots around curbs. Lightly running a finger along interior joints can reveal cool, clammy surfaces.
Infrared scans or a pin-type meter confirm moisture without invasive cuts. Addressing compromised counterflashing, worn gaskets, and capillary pathways early prevents rot, mold growth, and costly structural repair.
Seasonal Expansion Gaps
As temperatures swing between seasons, roofing materials, skylight frames, and chimney masonry expand and contract at different rates, opening micro-gaps that water exploits.
This seasonal weather cycle drives thermal expansion and contraction, stressing seals, flashing, and counter-flashing. Small separations allow capillary action to pull water under shingles and around curbs, where it travels unseen along underlayment and framing. Stains may appear far from the source, misleading diagnosis.
Key controls include:
- Inspect flashing, step flashing, and sealant at every change of plane each spring and fall.
- Replace brittle sealants with high-quality, compatible elastomerics designed for movement.
- Verify skylight weep channels are clear; clean debris that blocks drainage.
- Re-seat or re-crimp metal flashing disturbed by ice, wind, or prior repairs.
Proactive maintenance prevents hidden rot and interior damage.
Nail Pops and Fastener Back-Out
Nail pops and fastener back-out occur when roofing nails or screws rise above the shingle or decking surface, compromising the roof’s seal and water-shedding ability. They often stem from improper nail installation, thermal cycling, deck movement, or fastener corrosion that loosens grip. Even a few raised heads can invite wind uplift and leak paths around the puncture.
| Cause | Indicator | Action |
| Shallow nailing | Raised heads | Re-drive, seal, replace |
| Overdriven nails | Fractured mat | Replace shingle, reset |
| Fastener corrosion | Rust staining | Swap to coated fasteners |
| Thermal cycling | Periodic lifting | Re-nail to proper depth |
| Missed framing | Poor hold | Re-fasten into structure |
Inspection should be periodic, focusing on slopes facing weather. Repairs prioritize correct shank length, ring-shank or screw-shank options, and manufacturer-approved sealants.
Sagging Decking or Structural Deflection
Though sometimes subtle at first, sagging decking or structural deflection signals a loss of stiffness in the roof system that can progress into leaks, ponding, and structural risk.
It often develops from undersized framing, prolonged moisture exposure, overloaded spans, or deteriorated fasteners. Visual cues include uneven roof planes, ridges in shingles, and ceiling cracks.
Left unaddressed, it undermines decking stability and compromises structural integrity, shortening service life and elevating repair cost.
To frame decisions, consider:
- Identify load sources: recent heavy snow, added HVAC, or solar arrays.
- Verify moisture pathways: failed flashing, poor ventilation, or vapor drive.
- Assess framing: check rafter size, spacing, bearing, and deflection limits.
- Plan remediation: drying, sistering members, adding mid-span support, or re-decking.
Documentation and timely engineering evaluation are essential.
Animal and Pest Intrusion
While often hidden until damage is advanced, animal and pest intrusion can rapidly compromise a roof’s weather barrier, insulation, and wiring. Rodents, raccoons, squirrels, birds, and insects exploit gaps at eaves, soffits, vents, and ridge lines, enlarging openings and transporting moisture-laden nesting materials.
Chewed sheathing, shredded vapor barriers, and gnawed conductors elevate fire risk and heat loss while inviting leaks and mold. Audible scurrying, displaced shingles, droppings in the attic, or daylight at penetrations are common indicators of wildlife damage.
Effective pest prevention begins with exclusion. Sealing gaps with metal flashing, hardware cloth, and gasketed vent covers blocks access. Trimming branches, clearing debris, and securing refuse reduce attraction.
Regular attic inspections and prompt repairs, paired with humane removal by licensed professionals, limit recurrence and escalating costs.
UV Damage and Granule Loss
Relentless ultraviolet exposure degrades asphalt shingles by drying out oils, embrittling the mat, and accelerating oxidation.
Relentless UV exposure dries oils, embrittles shingle mats, and accelerates oxidation-driven deterioration
As binders harden, protective ceramic granules loosen, slide into gutters, and leave dark, smooth patches. This UV damage thins the shingle’s armor, raising surface temperature, hastening aging, and inviting cracks and leaks. Granule loss also diminishes fire resistance and degrades curb appeal, often mistaken as mere cosmetic wear when it signals material fatigue.
Homeowners can track early indicators and reduce progression:
- Inspect gutters and downspouts for sand-like grit after storms.
- Scan sunny slopes for bald spots, blotchy shading, or exposed asphalt.
- Check attic for elevated heat or light penetration at noon.
- Schedule professional evaluations; consider reflective shingles, UV-resistant coatings, balanced attic ventilation, and prompt repair or replacement.
Frequently Asked Questions
How Often Should a Professional Roof Inspection Be Scheduled?
A professional roof inspection should be scheduled annually, and after severe weather. This roof inspection frequency helps identify hidden damage early. Professional inspection benefits include extended roof lifespan, validated warranties, improved safety, budget planning, and documentation for insurance claims and real estate transactions.
What Roofing Issues Are Typically Covered by Homeowners Insurance?
Homeowners insurance typically covers sudden, accidental roof damage from wind, hail, fire, or falling objects. Wear-and-tear or improper maintenance is excluded. Roofing claims depend on insurance policies’ deductibles, coverage type (replacement cost vs. actual cash value), and policy exclusions.
How Do Seasonal Weather Patterns Affect Roof Longevity?
Seasonal weather patterns affect roof longevity by driving expansion, contraction, moisture intrusion, and UV degradation. Seasonal impacts include freeze-thaw cycling, wind uplift, hail abrasion, and heat aging, which accelerate material fatigue, loosen fasteners, open seams, and shorten service life without timely maintenance.
Which Roof Maintenance Tasks Can Homeowners Safely DIY?
Homeowners can safely handle roof cleaning from the ground with soft washing tools, gutter maintenance, debris removal, minor shingle inspections, moss treatment, and sealant touch-ups on flashing, while avoiding steep pitches, damaged areas, pressure washers, and electrical hazards.
What Documentation Should I Keep for Future Roof Warranty Claims?
They should keep warranty documentation, proof of purchase, contractor license and insurance, permits, detailed invoices, material specs, installation photos, maintenance logs, inspection reports, repair receipts, and dated correspondence. This organized record streamlines the claim process and validates compliance with warranty terms.
Final Thoughts
Small, overlooked issues—lifted or missing shingles, loose flashing, clogged or mis-sloped gutters, attic moisture, and UV-driven granule loss—become big leaks if they’re not handled early. A simple plan keeps you ahead of trouble: schedule seasonal roof inspections, keep gutters and drainage clear, repair shingles and flashing promptly, and balance attic ventilation to protect decking and fasteners. If problems are widespread or you’re unsure of the source, move from DIY checks to a professional evaluation to protect your home and budget.
Ready to stop small problems before they become expensive repairs? Book a professional roof inspection or request a roof replacement estimate with Troy Roofing Pros. Explore our full services for residential and commercial roofs, or reach out via our contact page to get started today.