
Common roof problems include shingle degradation, failed flashing and sealants, clogged gutters, poor ventilation, and ice dams. Early signs are discoloration, curling, cracked tabs, exposed fasteners, rusted flashing, and granules in gutters. Prevent issues with semiannual inspections focused on seams, penetrations, flashing, and drainage. Clean gutters, verify slope, and use guards. Maintain sealants, replace corroded flashing, and guarantee proper overlaps. Manage snow loads and install ice-and-water shield at eaves. Document findings with photos and moisture readings to uncover the rest.
Key Takeaways
- Inspect semi-annually for curled shingles, rusted fasteners, lifted flashing, and granule loss; document with photos and moisture readings.
- Maintain flashing and sealant at penetrations, skylights, and step transitions; replace cracked caulk and corroded metals to prevent leaks.
- Keep gutters and downspouts clear, correctly sloped, and sealed; add guards and direct discharge away from the foundation.
- Address damaged or missing shingles immediately with roofing cement or temporary tarps; schedule permanent repairs to maintain the weather barrier.
- Manage snow and ice by raking, improving attic ventilation, and installing ice-and-water shield to prevent ice dams and seepage.
Identifying Early Signs of Roof Damage
Although roofs are engineered for decades of service, early warning signs often appear in subtle, inspectable cues. Observers should note roof discoloration patterns, which can indicate algae colonization, UV degradation, or granular loss on asphalt shingles.
Curling, cupping, or cracked shingles suggest thermal cycling fatigue. Rust at fasteners, exposed nail heads, and lifted flashing signal potential pathways for deterioration. Sagging at ridgelines or between rafters warrants structural integrity checks, including assessment of decking deflection and fastener withdrawal.
Gutter audits reveal shingle granules, pointing to accelerated wear. Inspect sealant joints around penetrations for shrinkage or crazing. Evaluate soffit and ridge ventilation for clear airflow, minimizing heat buildup that ages materials.
From the attic, daylight at joints, uneven substrate, and musty odors indicate components requiring closer evaluation without inferring active leakage.
Tackling Leaks and Water Intrusion

Leak pathways typically originate at roof penetrations, failed field membranes, or mechanical fasteners; a methodical moisture trace from the interior stain to the uphill source helps isolate the defect.
Inspect and maintain flashing, counterflashing, and sealant joints at chimneys, skylights, and wall connections, replacing cracked sealant with compatible elastomeric or butyl products and re-seating loose metal.
Confirm drainage is unobstructed by cleaning gutters, scuppers, and downspouts, verifying proper slope to drains, and installing guards to prevent debris-induced ponding.
Common Leak Sources
Many roof leaks originate at discontinuities—places where materials change or penetrate the roof assembly.
Typical sources include plumbing vents, skylight perimeters, chimney shoulders, and fastener penetrations in shingles or metal panels. HVAC curb interfaces and satellite-mast penetrations also disrupt water-shedding.
Interior symptoms may be misattributed: leaky pipes can mimic roof leaks, and attic condensation from inadequate ventilation or missing vapor retarders can drip onto ceilings.
Prevention relies on disciplined detailing and maintenance.
Verify slope-to-drain, intact underlayment, and proper shingle or panel headlap. Keep penetrations minimal and properly located away from valleys. Use compatible sealants only as secondary defense; prioritize mechanical terminations.
Inspect after severe weather for displaced fasteners and punctures. Maintain gutters and downspouts to prevent backflow. Confirm balanced attic ventilation to reduce moisture load and condensation risk.
Flashing and Seals
When water management hinges on details, flashing and sealant interfaces determine whether a roof sheds or admits moisture. Failures typically occur at penetrations, step changes, and terminations where movement, UV, and thermal cycling degrade components.
Proper selection of flashing types—step, counter, apron, valley, pipe boot, and headwall—matters as much as installation. Metal gauges, corrosion resistance, and correct overlaps (minimum 4 inches with shingle-style laps) reduce capillary action. Continuous counterflashing should be reglet-set or mechanically fastened, not surface-glued.
Sealant materials must match substrate and movement: high-performance silicone or polyurethane for metal and masonry, silyl-terminated polyether for wider joint movement, and compatible butyl tapes for concealed laps.
Inspect annually for cracks, debonding, and fastener back-out. Replace dried caulk; re-seat flashing; maintain clearance from siding and chimneys.
Drainage and Gutters
Beyond flashing interfaces, bulk water control depends on unimpeded drainage from roof plane to discharge point. Effective gutters, downspouts, and scuppers prevent ponding, fascia rot, and foundation saturation.
Proper gutter sizing, slope, and outlet density must match roof area, rainfall intensity, and contributing valleys. Debris management, secure hangers, and sealed joints reduce leak risk and ice formation.
When grades or site constraints exist, integrate drainage solutions such as leaders to daylight, dry wells, or storm tie-ins.
- Verify gutter sizing via rainfall maps (NOAA) and roof catchment; target 1/16–1/8 in. per foot pitch.
- Add downspouts at 30–40 ft intervals; use oversized outlets and strainers.
- Install gutter guards matched to debris type; maintain semiannually.
- Direct discharge 5–10 ft from foundations; use splash blocks or buried extensions.
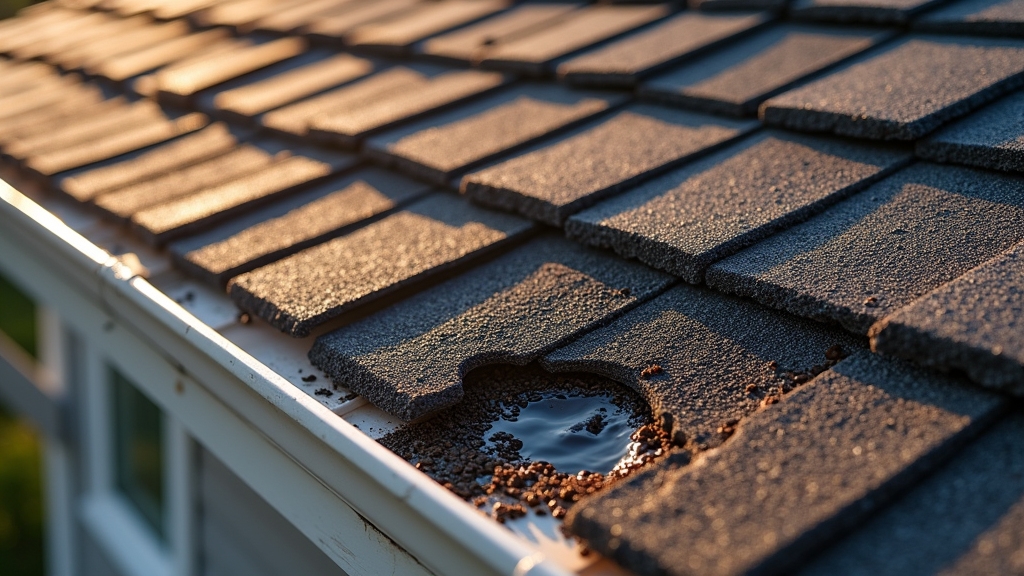
Dealing With Missing or Damaged Shingles
Spotting shingle damage starts with identifying curled tabs, granular loss in gutters, cracked or blown-off shingles, and exposed nail heads.
For immediate mitigation, a homeowner can resecure lifted tabs with roofing cement, apply a temporary patch with asphalt mastic, or tarp the affected slope with proper anchoring at the ridge and eaves.
These measures stabilize the roof envelope until permanent replacement and proper fastening can be scheduled.
Spotting Shingle Damage
How can early visual cues on shingles prevent costly roof failures? Observers should evaluate surfaces methodically, noting shingle wear, color fading, and mechanical distress that precedes leaks and deck rot. A roof-safe inspection from the ground and at the eaves, using binoculars, helps identify defects without damaging the assembly.
- Granule loss: Look for bald spots, excessive granules in gutters, and exposed asphalt—signals of UV degradation and shortened service life.
- Curling and cupping: Edge distortion indicates heat aging, ventilation imbalance, or moisture drive; increased uplift risk under wind loads.
- Cracking and splits: Thermal cycling and brittleness produce fissures that allow capillary water intrusion and fastener corrosion.
- Displacement and misalignment: Slipped or lifted tabs, nail pops, and raised flashing changes suggest fastening failure or substrate movement, warranting prompt evaluation by a roofing professional.
Quick Temporary Fixes
Stabilize the area to prevent water ingress and wind uplift until permanent repairs are scheduled. For missing or damaged shingles, a methodical approach to temporary patching limits sheathing saturation and interior leaks. Clear loose debris, dry the surface, and apply roofing cement under lifted tabs; press firmly and add galvanized roofing nails at concealed shingle locations. For absent shingles, slide a sheet-metal slip flashing or a cut asphalt shingle as a placeholder, seal edges, and tape seams with butyl tape. Tarping qualifies as emergency repairs: anchor past the ridge, fasten to furring strips, and avoid puncturing valleys.
| Task | Materials | Duration |
| Seal tabs | Roofing cement, putty knife | 10–15 min |
| Replace placeholder | Cut shingle, nails, sealant | 20 min |
| Tarp installation | Tarp, furring strips, screws | 30–45 min |
Preventing and Managing Ice Dams
Although ice dams form at the eaves, their root causes start under the roof. Ice dam formation begins when roof heat retention melts the underside of snow; refreezing at cold eaves creates a ridge that backs up water under shingles.
Ice dams start under roofs: attic heat melts snow; cold eaves refreeze, forcing water under shingles.
Management focuses on thermal control, drainage, and timely snow removal to prevent moisture intrusion, sheathing rot, and interior leaks.
1) Seal air leaks at penetrations—recessed lights, bath fans, chimneys—using fire-rated sealants and flashing to reduce conductive and convective heat loss.
2) Increase attic insulation to code R-values, ensuring continuous coverage at top plates with baffles to maintain airflow paths.
3) Install self-adhered ice-and-water shield from eaves to at least 24 inches inside the warm wall line.
4) Use roof rakes to reduce snow load; deploy heated cables only as targeted, supplemental mitigation.
Ensuring Proper Roof Ventilation
Effective ice dam control depends not only on insulation and air sealing but also on balanced roof ventilation that exhausts moist, warm air and admits cool, dry intake air. Proper ventilation systems maintain airflow balance between soffit intake and ridge or high-point exhaust. Aim for roughly 1:300 net free ventilation area (NFVA) of attic floor area, split 50/50 intake to exhaust, unless vapor barriers dictate 1:150. Verify unobstructed soffits, continuous baffles at eaves, and airtight ceiling planes. Use ridge vents with matching soffit vents; avoid mixing powered and passive exhaust on the same roof.
| Parameter | Guidance |
| NFVA Ratio | 1:300 typical; 1:150 with low-perm ceilings |
| Intake:Exhaust | Target 50:50 |
| Baffle Depth | Maintain 1–2 inches above insulation |
| Moisture Control | Add vapor retarder and seal penetrations |
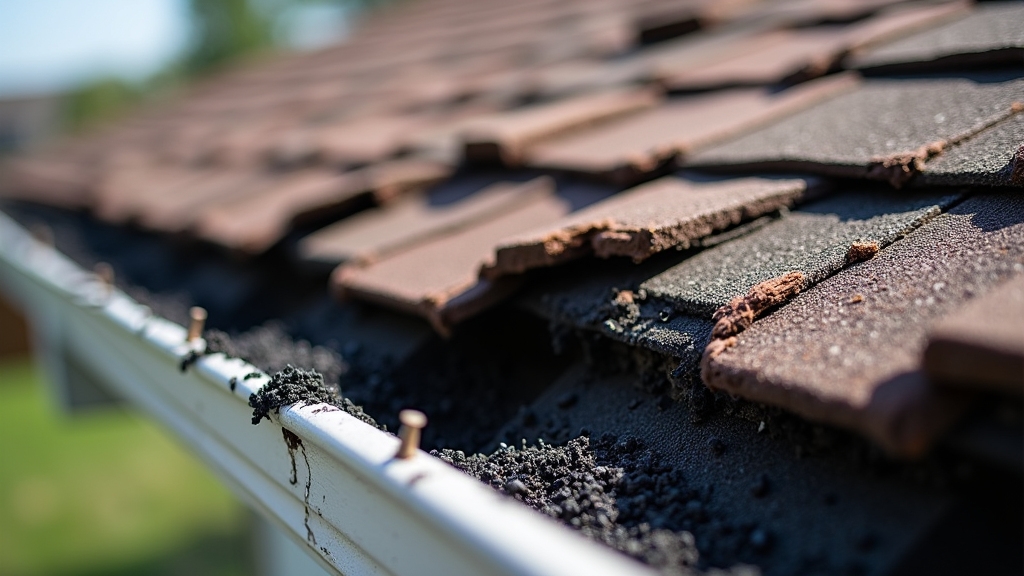
Keeping Gutters Clean and Functional
Routine gutter maintenance protects roof edges, fascia, and foundations by directing runoff away from the structure. When gutters clog, water backs up under shingles, saturates soffits, and erodes grading, leading to leaks and settlement. A disciplined approach combines inspection, debris removal, and hydraulic performance checks to keep conveyance unobstructed.
- Schedule semiannual gutter maintenance: clear troughs, downspouts, and leaders; verify positive slope (1/16–1/8 inch per foot) toward outlets.
- Perform debris removal with scoop and hose; flush downspouts to confirm full-bore flow. Install outlet strainers and consider perforated guards suited to roof type.
- Inspect hangers and spikes; upgrade to hidden hangers with stainless screws at 24-inch spacing to prevent sagging.
- Seal joints with elastomeric gutter sealant; check for pinholes, corrosion, and seam separation. Add splash blocks or extensions to discharge 6–10 feet from the foundation.
Addressing Flashing and Sealant Failures
Aging or improperly detailed flashing and failed sealant joints are primary paths for roof water intrusion, especially at penetrations, walls, chimneys, skylights, and eaves changes. Effective remediation starts by identifying cut edges, open laps, pinholes, and adhesion loss. Replace corroded flashing materials with compatible metals; avoid galvanic mismatch. Step, counter-, and apron flashing must overlap shingle courses correctly, with reglet cuts or termination bars at masonry.
| Issue | Practical Remedy |
| Open lap at step flashing | Install new step pieces with 3-inch overlaps; integrate with underlayment. |
| Cracked sealant at curb | Remove, clean, prime, apply compatible sealant types at specified bead size. |
| Skylight corner leaks | Add preformed corner saddles; verify head flashing diverter. |
| Wall shift gaps | Use kick-out flashing; extend siding clearances. |
Select sealant types (silicone, polyurethane, silyl-terminated) by substrate and UV exposure; honor joint movement with proper backer rod and bond-breakers.
Scheduling Inspections and Maintenance Routines
Although each roof assembly has unique risk factors, inspection cadence should be tied to climate exposure, roof age, and system type. A conservative baseline is semiannual inspections, plus post-event checks after hail, wind, or heavy snow.
Routine scheduling should align with warranty terms and insurance requirements, using maintenance checklists to standardize findings and actions.
- Establish frequencies: semiannual for low-slope membranes; quarterly in coastal, high-UV, or freeze-thaw zones; annual for newer steep-slope systems.
- Define scope: seams, flashing, penetrations, terminations, drains, parapets, fasteners, coatings, and attachment integrity.
- Document: photo logs, moisture readings, minor corrective actions, and deferred repairs with priority codes.
- Integrate tasks: debris removal, drain clearing, sealant touch-ups, fastener retightening, and coating spot repairs.
This approach reduces lifecycle costs, preserves warranties, and improves leak resilience.
Frequently Asked Questions
How Do Roofing Warranties Actually Work and What Voids Them?
Roofing warranties define warranty coverage for materials/labor, require registration, and hinge on maintenance requirements and authorized installation. Voids arise from improper installation, unapproved repairs, poor ventilation, storm damage exclusions, neglect, noncompliant fasteners, ponding water, altered substrates, or missed inspections and documentation.
What Roofing Materials Are Most Eco-Friendly and Durable?
Metal (recycled steel/aluminum), clay/concrete tile, and slate rank most eco-friendly and durable. Sustainable roofing includes cool-metal coatings, high SRI tiles, and slate longevity. Eco friendly options: FSC wood shakes, recycled rubber, and green roofs; verify embodied energy, recyclability, service life.
Can Solar Panels Damage My Roof or Void Insurance?
Yes—improper solar panel installation can penetrate membranes, cause leaks, or void warranties and insurance. He recommends licensed installers, manufacturer-approved mounts, flashed penetrations, structural assessment, documented roof maintenance, load calculations, fire/spacing compliance, and pre-approval from insurer and roofing manufacturer to preserve coverage.
How Does Homeowner’s Insurance Handle Roof Replacement Claims?
Homeowner’s insurance handles roof replacement claims by evaluating peril, age, and depreciation. Roofing claims hinge on ACV vs RCV insurance coverage, deductible, and exclusions. Document damage, mitigate further loss, obtain contractor estimates, meet adjusters, and follow policy notice, proof-of-loss, and code-upgrade provisions.
What Seasonal Roof Care Differs by Climate Zone?
Seasonal roof care differs by climate zone: cold regions prioritize ice-dam mitigation, attic ventilation checks, and snow load monitoring; arid zones focus on UV degradation, sealant upkeep; coastal areas emphasize corrosion control. Schedule seasonal inspections, integrate climate considerations, clear debris, verify flashing, document conditions.
Conclusion
Proactive roof stewardship minimizes lifecycle costs and prevents premature failure. Recognizing early distress—such as granule loss, lifted tabs, or ponding—helps you address problems before they escalate. By repairing leaks at penetrations, replacing compromised shingles, and controlling ice dams through insulation and ventilation, you protect both structure and interior. Proper intake and exhaust ventilation preserves sheathing integrity and shingle warranties, while disciplined gutter maintenance prevents fascia rot and moisture backflow. Scheduled inspections, thorough documentation, and timely sealant and flashing re-bedding are your best defenses against hidden water intrusion.
Still, professional expertise ensures long-term performance and warranty compliance. For comprehensive roof inspections, repairs, and replacements, trust Troy Roofing Pros—serving Troy, Rochester Hills, and surrounding Michigan communities. Our certified team handles asphalt, metal, and flat roofing systems with precision, code compliance, and durability in mind.
Ready to safeguard your roof and investment?
Call (248) 587-8250 or contact Troy Roofing Pros today for a free, no-obligation estimate and keep your home protected year-round.